이 튜토리얼의 소스는 https://github.com/gauryan/springboot2-tutorial 에서도 확인할 수 있습니다.
1. MySQL(MariaDB)에서 저장 프로시저 (SP_LIST_ADMIN) 생성한다.
CREATE PROCEDURE SP_LIST_ADMIN()
BEGIN
  SELECT id, userid, password, nick FROM TB_ADMIN;
END
CALL SP_LIST_ADMIN();
+-----+---------+----------+-------+
| id | userid | password | nick |
+-----+---------+----------+-------+
| 1 | testid1 | passwd1 | nick1 |
| 2 | testid2 | passwd2 | nick2 |
| 3 | testid3 | passwd3 | nick3 |
| 4 | testid4 | passwd4 | nick4 |
| 5 | testid5 | passwd5 | nick5 |
+-----+---------+----------+-------+
2. src/main/resources 에 mybatis-mapper 폴더를 생성하고, 그 안에 AdminMapper.xml 파일을 작성한다. MyBatis 에서 사용할 SQL 쿼리문을 정의 하는 파일이다.
<?xml version="1.0" encoding="UTF-8"?>
<!DOCTYPE mapper PUBLIC "-//mybatis.org//DTD Mapper 3.0//EN" "http://mybatis.org/dtd/mybatis-3-mapper.dtd">
<mapper namespace="com.tutorial.xyz.mapper.AdminMapper">
    <select id="listAdmin" resultType="Admin">
        CALL SP_LIST_ADMIN()
    </select>
</mapper>
3. src/main/java/com/tutorial/xyz 에 dto 폴더를 생성하고, 그 안에 Admin.java 파일을 작성한다. 이 파일은 DTO, VO, ENTITY 등으로 불리며, 쿼리 결과를 받는 용도이다. lombok 에서 제공되는 @Data 어노테이션을 사용하면, Getter와 Setter 메소드를 자동생성해주어서, 코드를 깔금하게 유지할 수 있다.
package com.tutorial.xyz.dto;

import lombok.Data;

@Data
public class Admin {
  private Long   id;
  private String userid;
  private String password;
  private String nick;
}
4. src/main/java/com/tutorial/xyz 에 mapper 폴더를 생성하고, 그 안에 AdminMapper.java 파일을 작성한다. 이 파일은 MyBatis에서 SQL쿼리와 객체를 연결해주는 역할을 한다. SQL 쿼리가 짧으면, XML파일에 정의하지 않고, 이 파일에서 @Select 어노테이션을 이용해서 SQL쿼리를 작성할 수도 있다. 아무래도 파일이 하나가 줄어드니 더 편하게 작업할 수 있을 것이다. 이 Mapper라고 하는 부분이 다른 언어에서 사용하는 웹프레임워크의 Model에 해당한다고 생각하면 편할 듯 한다.
package com.tutorial.xyz.mapper;

import java.util.List;

import com.tutorial.xyz.dto.Admin;

import org.apache.ibatis.annotations.Mapper;
// import org.apache.ibatis.annotations.Select;

@Mapper
public interface AdminMapper {

  // @Select("CALL SP_LIST_ADMIN()")
  // @Select("SELECT id, userid, password, nick FROM TB_ADMIN")
  List<Admin> listAdmin();
}
5. src/main/java/com/tutorial/xyz 에 controller/mgmt 폴더를 생성하고, 그 안에 AdminController.java 파일을 작성한다. 특정 URL을 요청하면 동작하는 method를 정의하는 부분이다. @Controller 어노테이션을 사용해야 하며, 호출될 Method 위에는 @GetMapping 어노테이션을 이용해서 URL을 지정한다. 그리고, 앞에서 만들어 놓은 AdminMapper를 통해서 DB에 접근할 수 있다. Mapper 와 Controller 사이에 Service 레이어를 추가하는 경우가 많은데, 특별한 목적이 있지 않으면 복잡도만 증가시킨다고 판단하여 작성하지 않았다.
package com.tutorial.xyz.controller.mgmt;

import java.util.List;

import com.tutorial.xyz.dto.Admin;
import com.tutorial.xyz.mapper.AdminMapper;

import org.springframework.stereotype.Controller;
import org.springframework.ui.Model;
import org.springframework.web.bind.annotation.GetMapping;
import org.springframework.web.bind.annotation.RequestMapping;

@Controller
@RequestMapping("/mgmt")
public class AdminController {

  private AdminMapper mapper;

  public AdminController(AdminMapper mapper) {
    this.mapper = mapper;
  }

  // 관리자 목록
  @GetMapping("/admin")
  public String list(Model model) {
    List<Admin> admins = mapper.listAdmin();
    model.addAttribute("admins", admins);

    return "mgmt/admin/list";
  }

}
6. src/main/resources/templates 에 mgmt 폴더를 생성하고 layout.html 파일을 작성한다. 파일이름처럼 layout을 위한 파일이며, content 부분에 다른 파일들의 내용이 채워질 것이다. head 태그 안에는 jquery 와 bootstrap 관련 항목이 포함되어 있다.
<!DOCTYPE html>
<html lang="ko"
  xmlns:th="http://www.thymeleaf.org"
  xmlns:layout="http://www.ultraq.net.nz/thymeleaf/layout">
<head>
  <meta charset="UTF-8">
  <meta http-equiv="X-UA-Compatible" content="IE=edge">
  <meta name="viewport" content="width=device-width, initial-scale=1.0">
  <script src="https://code.jquery.com/jquery-3.6.0.min.js"></script>
  <link href="https://cdn.jsdelivr.net/npm/bootstrap@5.1.3/dist/css/bootstrap.min.css" rel="stylesheet">
  <script src="https://cdn.jsdelivr.net/npm/bootstrap@5.1.3/dist/js/bootstrap.bundle.min.js"></script>
  <title>Spring Tutorial</title>
</head>
<body>
  <th:block layout:fragment="content"></th:block>
</body>
</html>
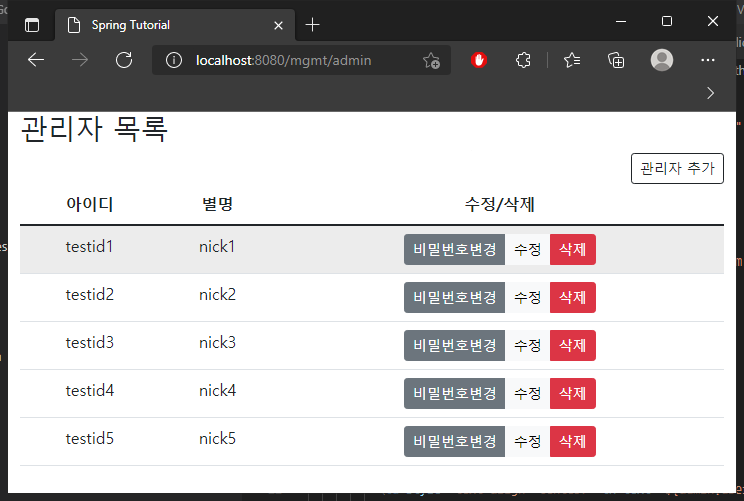
7. src/main/resources/templates/mgmt 에 admin 폴더를 생성하고, 그 안에 list.html 파일을 작성한다. Thymeleaf로 작성된 HTML 템플릿이다. 관리자 목록을 출력해주고 있다. HTML태그에서는 어떤 layout 파일을 사용할지 지정하고 있다. mgmt폴더 아래에 있는 layout.html 을 레이아웃으로 지정하고 있는 것이다. 이 외에도 Thymeleaf 태그들이 어떻게 사용되고 있는지 유심히 볼 필요가 있다. 아랫 부분에는 Modal 다이얼로그를 위한 부분도 있는데, bootstrap 과 jquery 를 이용한다.
<!DOCTYPE html>
<html xmlns:th="http://www.thymeleaf.org"
      xmlns:layout="http://www.ultraq.net.nz/thymeleaf/layout"
      layout:decorate="~{mgmt/layout}">

<th:block layout:fragment="content">
  <div class="container-fluid">
    <h2>관리자 목록</h2>
    <div style="text-align: right;">
      <a href="javascript:show_dialog('/mgmt/admin/insert_form');" class="btn btn-sm btn-outline-dark">관리자 추가</a>
    </div>
    <table class="table table-hover">
      <thead>
        <tr>
          <th style="text-align: center;">아이디</th>
          <th style="text-align: center;">별명</th>
          <th style="text-align: center;">수정/삭제</th>
        </tr>
      </thead>
      <tbody>
        <tr th:each="admin : ${admins}">
          <td style="text-align: center;" th:text="${admin.userid}"></td>
          <td style="text-align: center;" th:text="${admin.nick}"></td>
          <td style="text-align: center;">
            <div class="btn-group" role="group" >
              <a th:href="|javascript:show_dialog('/mgmt/admin/chg_passwd_form/${admin.id}');|" class="btn btn-sm btn-secondary">비밀번호변경</a>
              <a th:href="|javascript:show_dialog('/mgmt/admin/update_form/${admin.id}');|" class="btn btn-sm btn-light">수정</a>
              <button th:onclick="|delete_admin('/mgmt/admin/delete/${admin.id}')|" type="button" class="btn btn-sm btn-danger">삭제</button>
            </div>
          </td>
        </tr>
      </tbody>
    </table>
  </div>
  <div id="myModal" class="modal fade" role="dialog" tabindex="-1" aria-hidden="true">
    <div class="modal-dialog modal-dialog-centered">
      <div class="modal-content">
      </div>
    </div>
  </div>

  <script>
    // Modal Remote Reload
    $(document).on('hidden.bs.modal', function (e) {
        $(e.target).removeData('bs.modal');
    })

    function show_dialog(url) {
      $('#myModal .modal-content').load(url, function(e){
          $('#myModal').modal('show');
      });
    }

    function delete_admin(url) {
        var result = confirm("관리자를 정말로 삭제하시겠습니까?");
        if( result == false ) return;
        location.href = url;
    }
  </script>
</th:block>

</html>
9. 이제, 웹브라우저에서 http://localhost:8080/mgmt/admin 에 접속하면 관리자 목록을 볼 수 있을 것이다. 여기까지 성공했으면, Tutorial 프로젝트의 50% 이상을 진행한 것이나 마찬가지다. ^^
'Framework > Spring' 카테고리의 다른 글
| 관리자 수정하기 : Spring Boot 2.x.x Web Tutorial (0) | 2021.11.22 |
|---|---|
| 관리자 비밀번호 변경하기 : Spring Boot 2.x.x Web Tutorial (0) | 2021.11.22 |
| 관리자 추가하기 : Spring Boot 2.x.x Web Tutorial (0) | 2021.11.21 |
| Spring 프로젝트 생성하기 : Spring Boot 2.x.x Web Tutorial (0) | 2021.11.17 |
| 개발환경 구성하기 : Spring Boot 2.x.x Web Tutorial (0) | 2021.11.17 |